** Floating Static & IP SLA(Service Level Agreement) **

- Static Route의 경우 목적지까지 경로가 다수 존재할
경우에도 Best Path에 장애가 발생하면 자동으로 경로를
우회할 수 없다.(즉, Convergence(수렴)X)
- 이 경우 관리자가 Static Route의 AD 값을 임의적으로
조정하여 미리 Backup Path를 설정하는 것이 가능하다.
이러한 방식을 ‘Floating Static Route’ 라고 한다.
<공통>
en
conf t
no ip domain loo
lin con 0
exec-time 0 0
logging syn
!
<R1>
conf t
ho R1
int fa 0/0
ip add 100.1.1.126 255.255.255.128
no shut
!
int s 0/0
encapsulation ppp
ip add 211.100.1.1 255.255.255.252
no shut
!
int s 0/1
encapsulation ppp
ip add 211.100.1.5 255.255.255.252
no shut
!
<R2>
conf t
ho R2
int fa 0/0
ip add 100.1.1.254 255.255.255.128
no shut
!
int s 0/0
encapsulation ppp
ip add 211.100.1.2 255.255.255.252
clock rate 128000
no shut
!
int s 0/1
encapsulation ppp
ip add 211.100.1.6 255.255.255.252
clock rate 128000
no shut
!
------------------------------------------------------------------------------------------------------------------------
[2.Static설정]
<R1>
conf t
ip route 100.1.1.128 255.255.255.128 211.100.1.2
ip route 100.1.1.128 255.255.255.128 211.100.1.6 100
!
<R2>
conf t
ip route 100.1.1.0 255.255.255.128 211.100.1.1
ip route 100.1.1.0 255.255.255.128 211.100.1.5 100
!
-> 설정 후 평소에는 AD=1 경로만 Routing Table에 등록되어
있다. (Router는 Best Path 경로만 등록)
만약 Best Path에 장애가 발생되면 Backup Path인 AD=100
경로가 자동으로 Routing Table에 등록된다.
------------------------------------------------------------------------------------------------------------------------
** GNS3에서 Floating Static 설정 추가 **

- 기존에 GNS3 LAB에 설정되어 있던 Static Router는 다음과
같다.
<R2>
ip route 3.3.3.0 255.255.255.0 f0/0 1.1.100.1
ip route 3.3.3.0 255.255.255.0 f0/1 1.1.100.10 100
<R3>
ip route 3.3.3.0 255.255.255.0 fa 0/0 1.1.100.14
ip route 1.1.1.0 255.255.255.0 fa 0/1 1.1.100.9
<R4>
ip route 3.3.3.0 255.255.255.0 fa 0/1 1.1.100.18
ip route 1.1.1.0 255.255.255.0 fa 0/0 1.1.100.13
<R1>
ip route 3.3.3.0 255.255.255.0 f0/1 1.1.100.6
ip route 1.1.1.0 255.255.255.0 f0/0 1.1.100.2
<R5>
ip route 1.1.1.0 255.255.255.0 f0/0 1.1.100.5
ip route 1.1.1.0 255.255.255.0 f0/1 1.1.100.17 100
=> 위와 같이 GNS3 LAB에서 Floating Static을 설정하여도
Best Path 장에서 정상적인 경로 우회는 이뤄지지
않는다.
예를 들어 R1~R2 사이 Link에 장애 발생시 R1은 장애를
감지하고 Backup 경로를 Routing Table에 등록할 수 있다.
하지만 원격지 장비인 R3의 경우 장애 여부를 할 수 없기
때문에 응답 트래픽을 여전히 R2~R3 경로로 전송한다.
-> 결과적으로 통신은 실패!
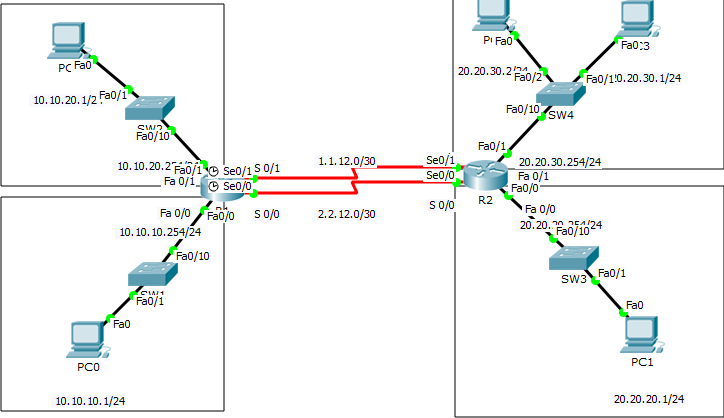
=> Floating Static은 2개의 Router가 다수의 Link로 직접
연결된 경우에 효과적이다. (Ex. Packet Tracer LAB)
- 하지만 위와 같은 경우에도 IP SLA를 같이 사용하게 되면
정상적으로 경로 우회가 가능하다.
IP SLA(Service Level Agreement)는 Router에서 특정
서비스가 정상적으로 동작하는 가상의 트래픽을 만들어
특정 장비에게 전송한다. ( TCP/UDP/ICMP…)
만약 트래픽을 수신한 장비가 정상적인 응답을 하지 않을
경우 Service에 문제가 발생된 것으로 판단할 수 있다.
<R1>
conf t
int fa 0/0
no shut
!
<R3>
conf t
no ip route 1.1.1.0 255.255.255.0 fa 0/1 1.1.100.5
no ip route 1.1.1.0 255.255.255.0 fa 0/0 1.1.100.17 100
ip route 1.1.100.0 255.255.255.252 fa 0/1 1.1.100.5
ip sla 1
icmp-echo 1.1.100.2
frequency 5
exit
ip sla schedule 1 life forever start-time now
track 10 rtr 1 reachability
ip route 1.1.1.0 255.255.255.0 fa 0/1 1.1.100.5 track 10
ip route 1.1.1.0 255.255.255.0 fa 0/0 1.1.100.17 100
=>설정 후 R1에서 [ping 3.3.3.3 so 1.1.1.1 repeat 10000]
명령어로 ping 전송 후 R2의 fa 0/1을 끊어보자.
R3에서 R1--R2 구간의 문제를 IP SLA를 통해 감지하고
우회 경로를 등록하는 것을 확인할 수 있다. 하지만
R1에서 ping test를 계속 답변이 돌아오지 않는다.
이유는?? GNS3 환경에서 Ethernet 인터페이스가 연결된
상대방 장비 포트의 Down 상태를 감지하지 못하기 때문이다.
아래와 같이 R1--R2 구간을 Serial 인터페이스로 변경해서
다시 확인해보자!!
<R1>
conf t
default int fa 0/0
no ip route 3.3.3.0 255.255.255.0 fa 0/0 1.1.100.2
int s 1/0
ip add 1.1.100.1 255.255.255.252
no shut
!
ip route 3.3.3.0 255.255.255.0 s1/0 1.1.100.2
<R2>
conf t
default int fa 0/1
no ip route 1.1.1.0 255.255.255.0 fa 0/1 1.1.100.1
int s 1/0
ip add 1.1.100.2 255.255.255.252
no shut
!
ip route 1.1.1.0 255.255.255.0 serial 1/0 1.1.100.1
-Verify-
do ping 3.3.3.3 so 1.1.1.1 repeat 10000
do trace 3.3.3.3
------------------------------------------------------------------------------------------------------------------------
<R1>
conf t
ip route 20.20.0.0 255.255.0.0 1.1.12.2
ip route 20.20.30.1 255.255.255.255 2.2.12.2-> 특정장비 하나를 지목
<R2>
conf t
ip route 10.10.0.0 255.255.0.0 1.1.12.1
==================================================================

<R2>
conf t
int lo 0
ip add 2.2.2.2 255.255.255.0
!
int fa 0/0
ip add 1.1.100.1 255.255.255.252
no shut
!
router eigrp 100
no auto-summary
net 2.2.2.2 0.0.0.0
net 1.1.100.1 0.0.0.0
!
<R1>
conf t
int lo 0
ip add 1.1.1.1 255.255.255.0
!
int fa 0/0
ip add 1.1.100.2 255.255.255.252
no shut
!
int fa 0/1
ip add 1.1.100.5 255.255.255.252
no shut
!
router eigrp 100
no auto-summary
net 1.1.100.2 0.0.0.0
net 1.1.1.1 0.0.0.0
!
router rip
version 2
no auto
net 1.0.0.0
!
<R3>
conf t
int lo 0
ip add 3.3.3.3 255.255.255.0
!
int fa 0/0
ip add 1.1.100.6 255.255.255.252
no shut
!
router rip
ver 2
no auto
net 1.0.0.0
net 3.0.0.0
!/
----------------------------------------------------
** Redistribution(재분배) **
- Redistribution 설정시 Routing Protocol마다
사용되는 옵션이 다르다.
1) 다른 Routing Protocol --> OSPF : subnets
2) 다른 Routing Protocol --> RIP : metric(임의의 hop-count)
3) 다른 Routing Protocol --> EIGRP : metric(임의의 B/W, DLY, 신뢰성, Load, MTU)
[do sh int f0/0] 광고하는쪽 확인해보면 나온다.
- Redistribute Configuration -
<R1>
conf t
router rip
redistribute eigrp 100 metric 2
!
router eigrp 100
redistribute rip metric 100000 10 255 1 1500
!
<R2>
conf t
int fa 0/1
ip add 1.1.100.9 255.255.255.252
no shut
!
router eigrp 100
net 1.1.100.9 0.0.0.0
no net 2.2.2.2 0.0.0.0
redistribute connected
!
<R4>
conf t
int fa 0/0
ip add 1.1.100.10 255.255.255.252
no shut
!
int fa 0/1
ip add 1.1.100.13 255.255.255.252
no shut
!
int lo 0
ip add 4.4.4.4 255.255.255.0
!
router eigrp 100
no auto
net 4.4.4.4 0.0.0.0
net 1.1.100.10 0.0.0.0
redistribute rip metric 100000 10 1 255 1500
!
router rip
ver 2
no auto
net 1.0.0.0
redistribute eigrp 100 metric 2
!
<R3>
conf t
int fa 0/1
ip add 1.1.100.14 255.255.255.252
no shut
!
=> 설정 후 R4의 fa 0/0을 [shut -> no shut] 상태로
변경한 후 Routing Table을 확인해보면 [2.2.2.0/24]
경로가 D EX(AD=170)가 아닌 R(AD=120)경로를
선택하고 있다. (즉, 우회 경로를 사용!)
=> EIGRP의 AD 값을 조정하여 효율적인 경로를 선택하게
다음과 같이 설정을 변경해보자.
<R4>
conf t
router eigrp 100
distance eigrp 90(내부) 115(외부) -> AD값 조정/외부는 원래 170
-verify-
do sh ip protocol
- EIGRP 외부 AD 값을 조정한 후 R1/R4에서 [2.2.2.0/24]
경로는 정상적으로 R2로 향하게 된다.
하지만 반대로 RIP에서 재분배 된 정보가 R3가 아니라
EIGRP 경로로 우회하게 된다. 이유는 EIGRP 외부 AD값
(115)이 RIP AD값(120) 보다 작기 때문이다.

<R1>
conf t
access-list 10 permit 3.3.3.0 0.0.0.255
access-list 10 permit 1.1.100.12 0.0.0.3
router rip
distance 100 1.1.100.6 0.0.0.0 10
!
- Verify -
do sh run | section router rip
<R4>
conf t
access-list 1 permit 3.3.3.0 0.0.0.255
access-list 1 permit 1.1.100.4 0.0.0.3
router rip
distance 100 1.1.100.13 0.0.0.0 1
=> EIGRP와 RIP의 AD값 조정 후 [2.2.2.0/24]과
[3.3.3.0/24] 경로는 관리자의 의도대로 Routing
Table에 등록되었다.
<R3>에서 Routing Table을 확인해보면 [4.4.4.0/24]
경로가 Load-balancing 되고 있다. 이유는 <R1/R4>
에서 재분배를 설정할 때 Metric 값을 동일하게
2로 설정했기 때문이다.
<R4>는 자신의 Connected 정보인 [4.4.4.0/24]에
대해서 Metric 값이 1이 되도록 설정해보자!
** Router-map **
- Route-map은 정책 설정을 위해서 다양한 목적으로
사용된다. Route-map 설정 순서는 다음과 같다.
1) 정책이 적용될 Network 대역을 정의.
(access-list/prefix-list)
2) Route-map 생성.
3) match 명령어로 Network 대역을 불러온다.
4) set명령어를 사용하여 해당 Network에 대한
정책 설정.
5) Route-map을 interface 혹은 redistribute 등에
적용.
<R4>
access-list 50 permit 4.4.4.0 0.0.0.255
route-map RIP_Metric (permit 10)
match ip address 50
set metric 1
!
(route-map RIP_Metric deny 20) -> 이놈이 디폴트로 숨어 있다.
route-map RIP_Metric permit 20
router rip
redistribute eigrp 100 metric 2 route-map RIP_Metric
-> Route-map의 마지막에는 [deny <마지막 순서번호+10>이
생략되어 있다! 다른부분은 정책 변경 없이 재분배로
넘겨주기 위해서는 [permit <마지막 순서번호+10>]을
입력해줘야 한다!
'공부 > CCNP' 카테고리의 다른 글
| Cisco Router Path Control(2) (0) | 2021.11.20 |
|---|---|
| Cisco Router ACL 설정 (0) | 2021.11.20 |
| ICT보안실무_NTP (0) | 2017.06.11 |
| ICT보안실무_실습 (0) | 2017.06.11 |
| ICT보안실무_DHCP Relay Agent (0) | 2017.05.14 |


댓글